A Homopolar motor is one of my boys favorite things to make!! These motors are so fun to learn about and to experiment with. My boys and I have been playing around with them all week and we have learned a couple things to make it a little bit easier for you to create your own.

First off, what is a homopolar motor. In short it is an electric motor. This motor, that you are going to learn how to create, is not strong enough to power anything, but it looks really cool and is very entertaining.
Here is a quick recap of how it works.
Energy from the battery travels in one direction (DC- direct current) from one end of the battery, to the other end. Copper wire, which conducts electricity, is made into a shape that connects the two ends of the battery, creating a continuous flow of electricity. The current travels through the copper wire back to the battery to complete the circuit.
The magnets in this experiment also have a positive end and a negative end creating a magnetic force that moves up towards the battery. This electromagnetic opposing force causes an outward motion, forcing the wire to spin in a circular motion. Here is a picture from MAGCRAFT illustrating the different forces.
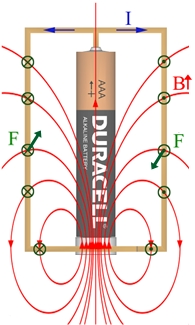
This electromagnetic force is called the Lorentz force which is pretty awesome eh?? The electric motor was first discovered by Michael Faraday back in 1821. Now that is your physics lesson for the day (for more check this article out), lets get to how you can make these awesome motors.
Here is what you need to make your own Homopolar Motor
- AA Battery
- Neodymium magnet
- Copper wire – 14-18 Gauge (We bought some thin copper wire that didn’t work. We then used copper wire just out of household electrical wiring and stripped the copper wire out. It worked perfect.)
- Needle Nose Pliers with Wire cutter
Step #1
Take your copper wire and cut off about 8 inches (you can always shorten it later depending on what design you make). Take your copper wire and fold it in half and squeeze the bend together with your pliers.

Step #2 –
Pinch the folded part with your pliers and grab each end of the wire and bend it up. This pinched end will lay on the positive end of the battery.

Step #3 –
Bend the wire again the same distance from the center on both sides. If your shape isn’t balanced, it will have a harder time staying on the battery. Measure the length of the battery and extend the wire past that length. Bend another 90 degree angle creating a rectangle.

Step #4 –
Shape the overlapping ends of the copper wire to mold to the battery or magnets. Have an end slightly touch the battery or magnet so the electrical circuit is complete.
Step #5 –
Place the negative side of the AA battery on top of a couple magnets. If you place a larger magnet on the bottom and stick with with double sided tape to the counter, this will help prevent the battery from falling over. Another trick that we found to be useful is to use double sided tape to attach two washers to the positive side of the battery, this will help the wire stay on.

Step #6-
Balance your copper wire on top of the battery. Make sure the bottom wire is touching the battery or the magnets, BUT NOT EACH OTHER. The ends of the wire shouldn’t be touching each other. Adjust the wire as needed. It may not work the first time, but once you move it around and play with it a little bit the wire will come to life and you and your kids will be entranced!!
To add a fun twist to your homopolar motor, make an optical illusion. There are some examples below in the video, and you can make your own as well. Cut out a circle on white paper. On one side draw a stick figure with his arms out and on the other side draw a fire. Attach this circle to the copper wire and as it spins it will appear that the stick figure is warming his hands by the fire.
The options for this activity is endless. Let your children’s imagination go wild!! I highly encourage your kids to try and create their own.
Have your kids get out their science notebooks and diagram their own homopolar motor in their notebook. This is a fun activity and is a way to get what is in their head onto paper.
JUST AS AN FYI: This activity will make your battery and magnets hot if they spin for awhile.
HAVE FUN! This is a perfect activity to do while reading The Boy Who Harnessed The Wind when William is learning about electromagnetism. Check this post out for other fantastic activities to make that book come alive while learning!!